Hang your bike on the wall with a premium oak hanger
So, you've invested in a road bike. So where do you store your pride and joy? Surely you don't leave it out on the street or locked-up in a shed...
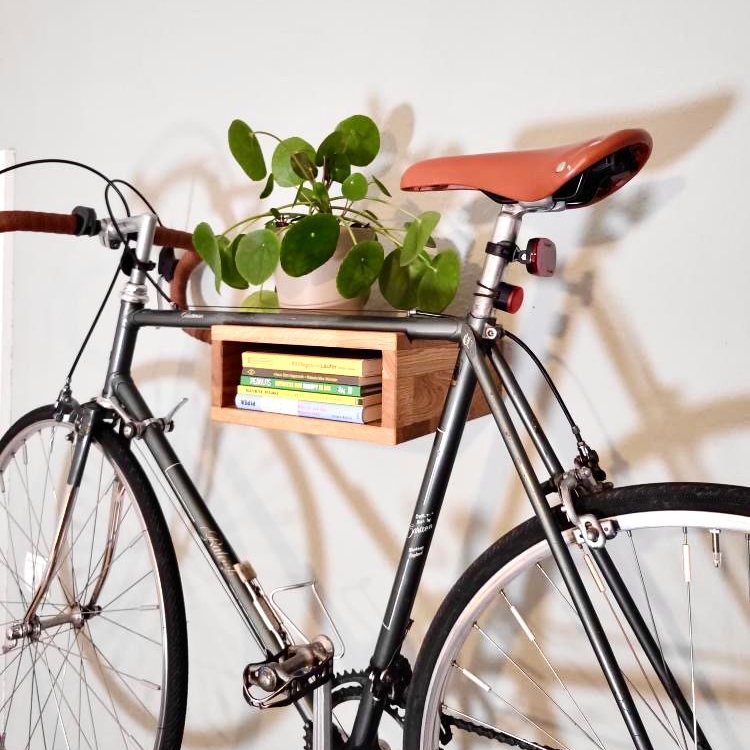
Bike storage options
Hmmm.... what to do, what to do? Your best option for storing your bike is somewhere it can't be bumped into, so it might be a good idea to mount it. Your options for mounting your bike are using hangers made from steel, plastic or wood.
So why would you choose wood?
If you're environmentally consious and like the look of natural products, then wood is a great option. There are so many types out there, which one should you choose? We recommend oak. So why oak and not, for instance plywood?
Oak wood for quality and style
A premium wood that grows naturally in Europe, oak is well-known for its durability and versitility. When cut, oak also shows beautiful grains, making each piece slightly unique. And when properly cared for, oak is less likely to warp in the sun and show signs of wear and tear. Oak has been used for centuries in Europe for furniture making, meaning it will never go out of style, standing the test of time.
Ok, I see clearly now. So if I wanted to get an oak wood bike hanger, how would I actually hang it on the wall?
Find a wall - and not just any wall
Determining the correct location to hang your bike on the wall is VERY important. Whilst the hangers can withstand the weight of your bike, not all walls can.
Load bearing walls, or masonry walls for the win
You'll need to ensure you've located a load bearing walll in your house/apartment. Once located, next step is determining the correct height for you. You'll want to make sure you can reach your bike easily if you hang it up high so as to not damage it taking it on and off. If you choose a lower point on the wall, make sure no one can accidentally bump into it.
Hold the hanger up to where you want your bike to hang and mark the wall with a pen or pencil. We recommend using a spirit level to ensure it hangs straight.
Get those tools ready
Now the fun begins... dust off those powertools because it's time to drill some holes in your wall. Make sure you have drill bits suitable for drilling into brick or conrete. And we always recommend using a cable detector to ensure you don't drill into a cable behind the wall.
Bzz bzz time to drill
Find the marks on the wall and drill the holes in the wall where you want to attach the hanger. Make sure to drill stright and deep enough to properly seat the plugs into.
Once the holes have been drilled, insert the plugs into the holes, making sure they're all the way in. Depending on the type of hanger you've purchased, it's time to attache it to the wall. Position the hanger against the wall lining up the holes.
Screw it
Using a screw driver, carefully screw the screws tightly into the plugs, making sure they are straight. Be careful not to overtighten the screws or the wood may split. If necessary, use a drill to enlarge the hole slightly to allow the plug to fit snugly. Make sure the hanger is still firmly attached to the wall. It is important to be able to hang your bike safely.
Voila - time to hang your bike
Hanging the bike on the wall is the final step. Make sure your bike is secure and stable and cannot wobble around. If the hanger moves around, it hasn't been fastened to the wall securely.
Add a touch of pizazz
If you've opted for a hanger that's a shelf (not poles), it's time to style it. Maybe add an indoor plant, some books or a nice vase on top? The nice thing is, you can constantly change up how you style it.
Lastly - enjoy this piece of furniture. Just like your bike, it's an investment piece that should bring you as much joy as the bike itself. And let's be honest, it's not just practical, it'll also become a talking point in your home.